If a more extensive scanning range is required, a seven-day free trial of Nessus Professional or Expert is available, or a full upgrade can be opted for starting at USD 2,990 per year.
Nessus 10.0 and later has support for scanning on Raspberry Pi allowing it to be deployed anywhere.
A member of the Hacker Target team obtained a copy of Nessus Essentials 10.0.0 and installed it on a clean Ubuntu 20.04 system.
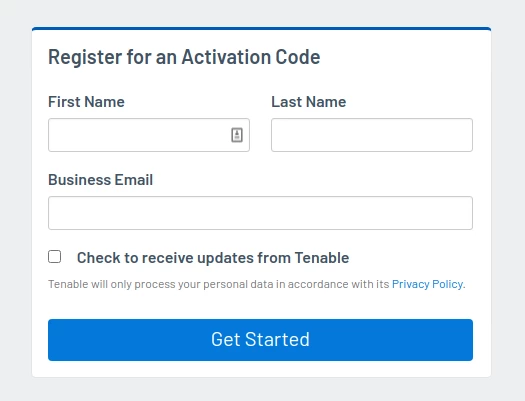
Register for an Activation Code
Although free, Nessus essentials require the user to register for an activation code
This activation does not expire however it is one use only. So, if you want to install Nessus on another machine or reinstall it, you need to register for another code.
An email from Tenable will be sent containing an activation code. See below:

Download and Install
Head to the downloads page and locate platform Ubuntu.

Install takes less than a minute. It is fast and easy as shown in the example below.
user@simulation:~$ sudo dpkg -i Downloads/Nessus-10.0.0-ubuntu1110_amd64.deb
[sudo] password for user:

Selecting previously unselected package nessus.
(Reading database ... 343156 files and directories currently installed.)
Preparing to unpack Nessus-10.0.0-ubuntu1110_amd64.deb ...
Unpacking nessus (10.0.0) ...
Setting up nessus (10.0.0) ...
Unpacking Nessus Scanner Core Components...
Created symlink /etc/systemd/system/nessusd.service -> /lib/systemd/system/nessusd.service.
Created symlink /etc/systemd/system/multi-user.target.wants/nessusd.service -> /lib/systemd/system/nessusd.service.

 - You can start Nessus Scanner by typing /bin/systemctl start nessusd.service
 - Then go to https://192.168.1.123:8834/ to configure your scanner
At the prompt, start the Nessus scanner start nessusd.service
user@simulation:~$ /bin/systemctl sudo start nessusd.service
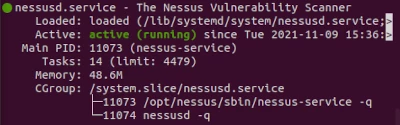
Now check the status to see if it is active/running with systemctl status nessusd
user@simulation:~$ systemctl status nessusd
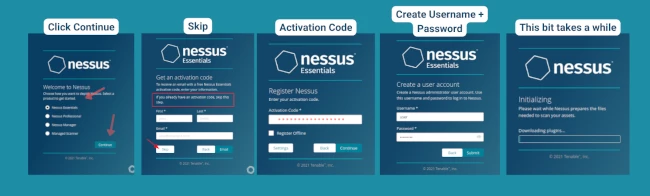
After setting an admin password during the web based configuration, I promptly managed to forget it. Reset the Nessus admin password easily using the nessuscli utility:
user@simulation:~$ sudo /opt/nessus/sbin/nessuscli chpasswd admin

Nessus Management Console
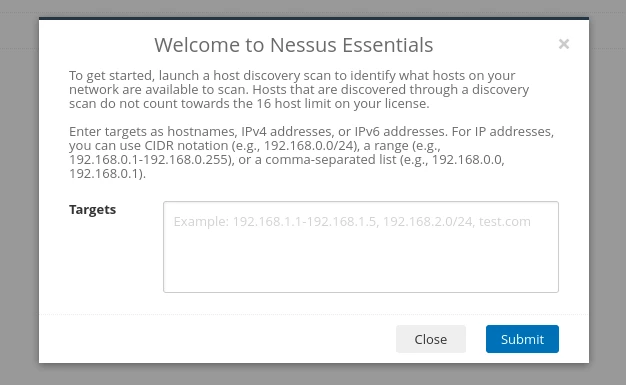
After logging in the first time you are presented with this popup. Launch a host discovery scan to identify what hosts on our network are available to scan. You can choose to do this or close this pop up and come back to to the "Host discovery scan" under the "New Scans" page
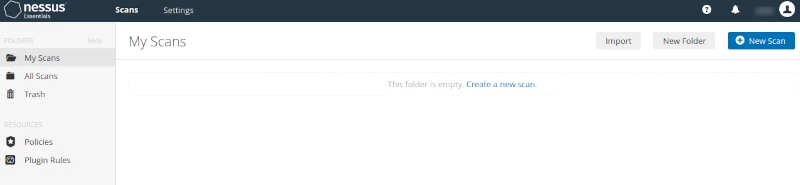
It's a simple interface and straight-forward to create a new scan. You have the option to create a New Folder to maintain organization for your scans, which will then appear under "My Scans" on the left side.
Settings
Settings provide information on the version, last update, license expiration, and Licensed Hosts - indicating how many of the 16 free scans you have used. From the menu on the left, you can access a variety of things such as Proxy Server, Password Management, and 'My Account'. There are a lot more settings to look through but for this post nothing needed to be configured and stuck with the default setup.
Create a Nessus Scan
Creating a scan is easy enough. Click on the + New Scan button or "Create a new scan".
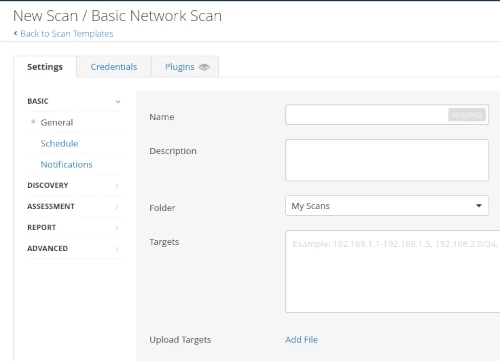
This takes you to the Scan Templates screen. Many users only use the default scan option, so clearly defining the available options as Basic Network Scan, Advanced Scan, Web App Tests and Malware Scan helps the user understand the scope of the test. Scrolling down the page shows other options, including those that require an upgrade to Professional to access.
An example is the Basic Network Scan option - see screenshot below - it's easy to see what information goes where. In this instance sticking with the default setup, added the info, and saved the scan.
For the scan target, you could enter a host-name, IP address or a network range.
Launch a Nessus Scan
From this page we can see previously run scans and the newly added scan. The last modified column shows run time of previously launched scans, here you can also select the play button to run the new scan (appearing at the bottom of the list) or re-run a previous scan. Once launched the scan jumps to the top row and goes about its scanning.
Nessus Report and Detection
The test scan did a good of detecting missing updates on the test Ubuntu system. For those unfamiliar with vulnerability scanners, I recommend you take a look at the options to customise the scan policies. One of the most important configurations options for basic network scans is to ensure you are performing credential scan. This allows much more in-depth coverage of the target as the scanner is able to interrogate the system for installed software and packages. Giving valuable information to the scan engine such as patch levels of the system for both Windows or Linux based targets.

Malware detection with Nessus
An interesting feature of Nessus is the known malware detection feature. Malware has been a problem since the days of the first boot loader virus's, however in today's world of ransomware, the threats are wide-spread and potentially devastating to an organisation.
The security industry is creating all manner of network based anomaly detection products to discover unknown malware. This capability seems quite simple and one I suspect will be beneficial to many organisations.
As the Nessus scanner performs a credential based scan of a system it can collect hashes of all the running processes and compare these to an online database that is effectively a clone of a system such as VirusTotal. So it immediately adds a new layer of defence to your Anti-virus capability. If your primary AV client misses a piece of malware; when you run your regular Nessus scan you may still catch the unknown malware. Understand however that like any AV detection it will also not find everything.
Nessus Command Line Scanning
So, the question is - with Nessus Essentials, can a scan be run from the command line? The short answer is no. Nor can it be done with a Nessus Pro account. In previous versions there was more that could be done via the command line, now, other than the initial setup and changing passwords, all scans are done via the GUI.
Nessus API access
What can we do with the API? --> Scans can't be run via the API. According to the answer on the community Q&A - this function is only available to Tenable.sc or Tenable.io consoles.
Conclusion
Overall, Nessus Essentials 10 is relatively easy to deploy and configure. You can be up and running within 15-20 minutes. This has been a quick review, further testing would be required to see how it scales on a large network and how comprehensive the vulnerability detection plugins are.
It is preferable to have multiple vulnerability scanner options available. Having more than one assists in correlation and provides an assurance that a vulnerability missed by one scanner may be picked up by the second. Our online OpenVAS scan based on the Greenbone Vulnerability Manager is an effective second assessment option, particularly when reviewing Internet-facing systems.