First, you would find your Windows ISO's, VLK & MSDN Keys and all the extra Software components (where is that winzip shareware?!). Then, you get started building systems, configuring the DC, workstations, accounts and on and on. Three days later, once it was all built we could snapshot the virtual machines. Take note of all configurations, and start playing.
DetectionLab and Vagrant
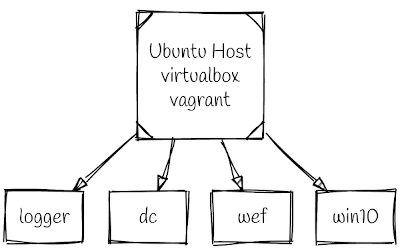
DetectionLab by Chris Long makes this initial configuration a piece of cake. It is quite simply amazing; if DetectionLab was thrown into a 1RU box with blinking lights (Lockeed/Boeing/Raython) would probably sell this thing as a Cyber Range for 7+ figures. The DetectionLab will run on many operating systems and Hypervisors, but, in this quick start guide, we will use a clean Ubuntu 20.04 host, VirtualBox, and Vagrant.

The DetectionLab will run on many operating systems and Hypervisors, but, in this quick start guide, we will use a clean Ubuntu 20.04 host, VirtualBox and Vagrant.
Included Software Components
There is a lot packaged together into this popup network.
| Hostname | Operating System | Software / Role |
|---|---|---|
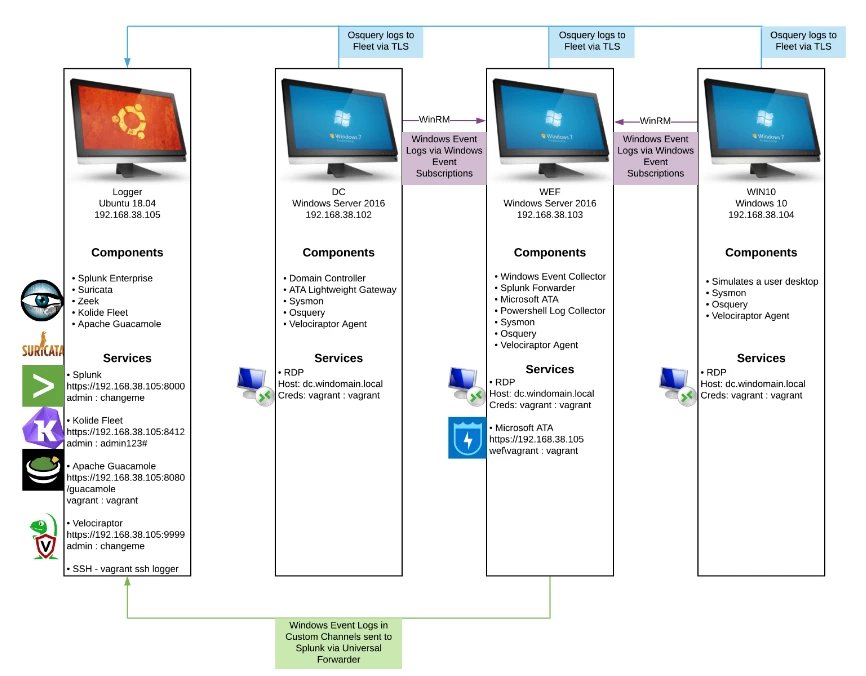
| Logger | Ubuntu 18.04 | Centralised logging with Splunk Enterprise (Free License - 500mb / limit), Fleet (the osquery manager), Suricata, Zeek, Velociraptor |
| DC | Windows 2016 (180 day eval) |
Domain Controller with osquery, velociraptor, sysmon |
| WEF | Windows 2016 (180 day eval) |
Windows Server with Event Collector, Splunk forwarder and osquery, Velociraptor agents |
| WIN10 | Windows 10 Workstation (180 day eval) |
Windows Workstation with agents (sysmon, osquery, velociraptor) |
Installing DetectionLab
Ok, enough with the introduction - start the stopwatch. Lets go!
Due to the number of virtual hosts, running the lab will require a minimum of an i5 with 16GB of memory. If you are planning on adding additional hosts, then more memory would be very helpful.
test@vbox:~/$ sudo apt install virtualbox virtualbox-ext-pack
This will install Virtualbox 6.1.6 from the Ubuntu repository. Keeping things fast and supported with easy updates. The name of the game in building our cyber security lab is to minimise hassle.
We will also install the latest vagrant from Hashicorp (2.2.9 is recommended - Ubuntu 20.04 ships with 2.2.6).
test@vbox:~/$ curl -fsSL https://apt.releases.hashicorp.com/gpg | sudo apt-key add -

test@vbox:~/$ sudo apt-add-repository "deb [arch=amd64] https://apt.releases.hashicorp.com $(lsb_release -cs) main"

test@vbox:~/$ sudo apt-get update && sudo apt-get install vagrant
Download the Deployment Files
Download the required files for deployment from github and kick off the prepare.sh script.
test@vbox:~/$ git clone https://github.com/clong/DetectionLab.git
test@vbox:~/$ cd DetectionLab/Vagrant
test@vbox:~/DetectionLab/Vagrant$ ./prepare.sh
[+] Checking for necessary tools in PATH...
  [-] Packer was not found in your PATH.
  [-] This is only needed if you plan to build you own boxes, otherwise you can ignore this message.
  [?] Vagrant was found in your PATH
  [?] Your version of Vagrant (2.2.16) is supported
  [?] Curl was found in your PATH

[+] Checking if any boxes have been manually built...
  [?] No custom built boxes found

[+] Checking for disk free space...
  [?] You have more than 80GB of free space on your primary partition

[+] Checking if any Vagrant instances have been created...
  [?] No Vagrant instances have been created yet

[+] Checking if the vagrant-reload plugin is installed...
  [?] The vagrant-reload plugin is currently installed

[+] Enumerating available providers...
Available Providers:
  [?] virtualbox

To get started building DetectionLab, run vagrant up.
If you run into any issues along the way, check out the troubleshooting and known issues page:
https://www.detectionlab.network/deployment/troubleshooting/
Before starting the vagrant builds, check that you are in a terminal that can launch the VirtualBox Guest GUI's. This means if you are connected to your test machine remotely using ssh you will want to use X forwarding in the session (ssh -X ...) and you will not want to be in tmux.
Essentially what happens with vagrant up is that each machine will be deployed and during the build the VirtualBox GUI will pop up as the machines are started. It is possible to build the hosts individually such as vagrant up logger but launching the following will build all 4 hosts. Depending on the bandwidth and CPU speed this will take some time, however here is the best part; no further interaction is required.
From a terminal the vagrant up process will need to launch the VirtualBox GUI, so we need to run this locally, or in an X forwarded session, if the host is remote & not in tmux:
In the terminal launch:
test@vbox:~/DetectionLab/Vagrant/$ vagrant up
During the installation and provisioning occasionally something may break as there are lots of moving parts. If a machine does not boot correctly check the error but if it is not obvious, you can simply try and re-provision the machine.
vagrant rebuilding and troubleshooting can be as simple as rebuilding a host.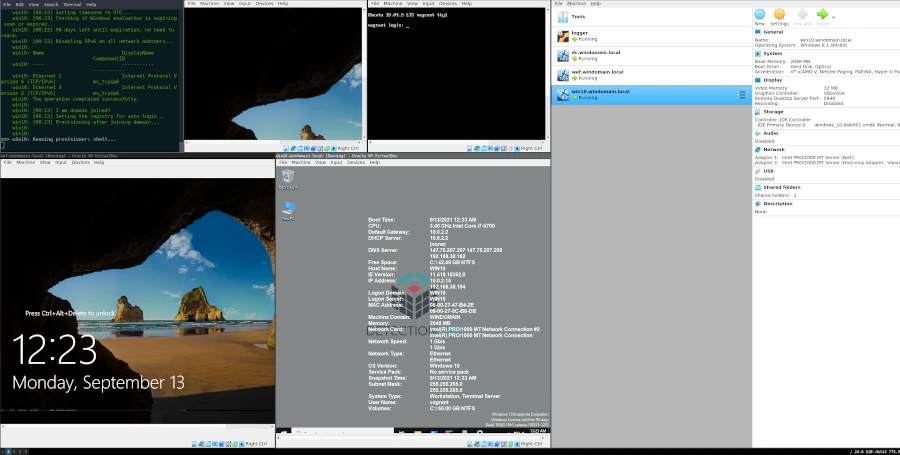
To reattempt the provisioning try vagrant reload wef --provision. If this fails you can simply remove the broken machine from the VirtualBox console and rerun vagrant up wef, this will often just work.
These basic functions of vagrant are good to know. If you mess up a machine during testing or when something breaks; rebuilding a single machine is a piece of cake.
Further Resources
The DetectionLab project site has great documentation and resources for further information. Including the excellent network layout diagram linked below and introductory YouTube video.
Nmap Scan of the DetectionLab Network
Lets take a quick look at the services available on our new host only network. This 192.168.38.0/24 is configured on the host and is isolated. Note: with these networks, outbound traffic is allowed as the network has a NAT gateway. Keep that in mind if you plan on testing any malicious software.
Starting Nmap 7.80 ( https://nmap.org ) at 2021-07-30 13:08 AEST Stats: 0:02:19 elapsed; 0 hosts completed (4 up), 4 undergoing Service Scan Nmap scan report for 192.168.38.102 Host is up (0.00053s latency). Not shown: 93 filtered ports PORT STATE SERVICE VERSION 53/tcp open domain? | fingerprint-strings: | DNSVersionBindReqTCP: | version |_ bind 88/tcp open kerberos-sec Microsoft Windows Kerberos (server time: 2021-07-30 03:08:10Z) 135/tcp open msrpc Microsoft Windows RPC 139/tcp open netbios-ssn Microsoft Windows netbios-ssn 389/tcp open ldap Microsoft Windows Active Directory LDAP (Domain: windomain.local, Site: Default-First-Site-Name) 445/tcp open microsoft-ds Windows Server 2016 Standard Evaluation 14393 microsoft-ds (workgroup: WINDOMAIN) 3389/tcp open ms-wbt-server Microsoft Terminal Services | rdp-ntlm-info: | Target_Name: WINDOMAIN | NetBIOS_Domain_Name: WINDOMAIN | NetBIOS_Computer_Name: DC | DNS_Domain_Name: windomain.local | DNS_Computer_Name: dc.windomain.local | DNS_Tree_Name: windomain.local | Product_Version: 10.0.14393 |_ System_Time: 2021-07-30T03:10:25+00:00 | ssl-cert: Subject: commonName=dc.windomain.local | Not valid before: 2021-07-27T06:16:20 |_Not valid after: 2022-01-26T06:16:20 |_ssl-date: 2021-07-30T03:11:05+00:00; 0s from scanner time. Service Info: Host: DC; OS: Windows; CPE: cpe:/o:microsoft:windows Host script results: |_nbstat: NetBIOS name: DC, NetBIOS user:, NetBIOS MAC: 08:00:27:a9:3b:cf (Oracle VirtualBox virtual NIC) | smb-os-discovery: | OS: Windows Server 2016 Standard Evaluation 14393 (Windows Server 2016 Standard Evaluation 6.3) | Computer name: dc | NetBIOS computer name: DC\x00 | Domain name: windomain.local | Forest name: windomain.local | FQDN: dc.windomain.local |_ System time: 2021-07-30T03:10:25+00:00 | smb-security-mode: | account_used: guest | authentication_level: user | challenge_response: supported |_ message_signing: required | smb2-security-mode: | 2.02: |_ Message signing enabled and required | smb2-time: | date: 2021-07-30T03:10:25 |_ start_date: 2021-07-28T06:16:29 Nmap scan report for 192.168.38.103 Host is up (0.00027s latency). Not shown: 99 filtered ports PORT STATE SERVICE VERSION 3389/tcp open ms-wbt-server Microsoft Terminal Services | rdp-ntlm-info: | Target_Name: WINDOMAIN | NetBIOS_Domain_Name: WINDOMAIN | NetBIOS_Computer_Name: WEF | DNS_Domain_Name: windomain.local | DNS_Computer_Name: wef.windomain.local | DNS_Tree_Name: windomain.local | Product_Version: 10.0.14393 |_ System_Time: 2021-07-30T03:10:26+00:00 | ssl-cert: Subject: commonName=wef.windomain.local | Not valid before: 2021-07-29T00:33:11 |_Not valid after: 2022-01-28T00:33:11 |_ssl-date: 2021-07-30T03:11:05+00:00; 0s from scanner time. Service Info: OS: Windows; CPE: cpe:/o:microsoft:windows Nmap scan report for 192.168.38.104 Host is up (0.00089s latency). Not shown: 98 filtered ports PORT STATE SERVICE VERSION 135/tcp open msrpc Microsoft Windows RPC 3389/tcp open ms-wbt-server Microsoft Terminal Services | rdp-ntlm-info: | Target_Name: WINDOMAIN | NetBIOS_Domain_Name: WINDOMAIN | NetBIOS_Computer_Name: WIN10 | DNS_Domain_Name: windomain.local | DNS_Computer_Name: win10.windomain.local | DNS_Tree_Name: windomain.local | Product_Version: 10.0.18362 |_ System_Time: 2021-07-30T03:10:25+00:00 | ssl-cert: Subject: commonName=win10.windomain.local | Not valid before: 2021-07-29T00:43:18 |_Not valid after: 2022-01-28T00:43:18 |_ssl-date: 2021-07-30T03:11:05+00:00; 0s from scanner time. Service Info: OS: Windows; CPE: cpe:/o:microsoft:windows Nmap scan report for 192.168.38.105 Host is up (0.00023s latency). Not shown: 95 closed ports PORT STATE SERVICE VERSION 22/tcp open ssh OpenSSH 7.6p1 Ubuntu 4ubuntu0.3 (Ubuntu Linux; protocol 2.0) | ssh-hostkey: | 2048 1f:9d:24:3e:07:2b:74:0c:6a:26:76:4f:0f:db:0f:01 (RSA) | 256 60:2b:09:3a:f4:17:42:b9:54:8f:9b:37:df:1b:31:b0 (ECDSA) |_ 256 25:c4:3c:ee:32:1f:a5:88:65:ad:9e:01:8e:51:bc:b3 (ED25519) 111/tcp open rpcbind 2-4 (RPC #100000) | rpcinfo: | program version port/proto service | 100000 2,3,4 111/tcp rpcbind | 100000 2,3,4 111/udp rpcbind | 100000 3,4 111/tcp6 rpcbind |_ 100000 3,4 111/udp6 rpcbind 8000/tcp open ssl/http Splunkd httpd | http-robots.txt: 1 disallowed entry |_/ |_http-server-header: Splunkd | http-title: Site doesn't have a title (text/html; charset=UTF-8). |_Requested resource was https://192.168.38.105:8000/en-US/account/login?return_to=%2Fen-US%2F | ssl-cert: Subject: commonName=logger/organizationName=SplunkUser | Not valid before: 2021-07-28T06:04:33 |_Not valid after: 2024-07-27T06:04:33 8080/tcp open http Apache Tomcat | http-methods: |_ Potentially risky methods: PUT DELETE |_http-open-proxy: Proxy might be redirecting requests |_http-title: Apache Tomcat 9999/tcp open ssl/abyss? | fingerprint-strings: | FourOhFourRequest: | HTTP/1.0 302 Found | Content-Type: text/html; charset=utf-8 | Location: /app/index.html | Date: Fri, 30 Jul 2021 03:08:46 GMT | Content-Length: 38 | href="/app/index.html">Found. | GenericLines, Help, Kerberos, LDAPSearchReq, LPDString, RTSPRequest, SSLSessionReq, TLSSessionReq, TerminalServerCookie: | HTTP/1.1 400 Bad Request | Content-Type: text/plain; charset=utf-8 | Connection: close | Request | GetRequest: | HTTP/1.0 302 Found | Content-Type: text/html; charset=utf-8 | Location: /app/index.html | Date: Fri, 30 Jul 2021 03:08:21 GMT | Content-Length: 38 | href="/app/index.html">Found. | HTTPOptions: | HTTP/1.0 302 Found | Location: /app/index.html | Date: Fri, 30 Jul 2021 03:08:21 GMT |_ Content-Length: 0 | ssl-cert: Subject: commonName=VelociraptorServer/organizationName=Velociraptor | Subject Alternative Name: DNS:VelociraptorServer | Not valid before: 2021-04-14T03:25:30 |_Not valid after: 2022-04-14T03:25:30 Service Info: OS: Linux; CPE: cpe:/o:linux:linux_kernel Post-scan script results: | clock-skew: | 0s: | 192.168.38.103 | 192.168.38.102 |_ 192.168.38.104 Service detection performed. Please report any incorrect results at https://nmap.org/submit/ . Nmap done: 4 IP addresses (4 hosts up) scanned in 185.53 seconds
There is a bunch of stuff here to poke at with your penetration testing tools. Deploy Kali Linux on another host in the network, or simply start looking through the logs and data coming into Splunk.
Conclusion
There are many things here to test, play with and explore. This is one of the great things about this setup. Fire it up and get your hands on tools that are preconfigured and ready to go. In case you did not notice from the previous praise, DetectionLab comes highly recommended whether you are just getting started in Cyber Security or you have been breaking computers for years.