Explore our OpenVAS Tutorial to get an overview of OpenVAS management and administration.
A focus on the backend services will allow you to get the full OpenVAS Vulnerability Scanning Framework up and running. Additional tips for troubleshooting and testing individual checks round out the tutorial.
This guide is perfect for beginners and experienced users alike, offering step-by-step instructions and expert tips to help you master OpenVAS and enhance your cybersecurity defenses.
Getting Started with OpenVAS
Overview of Components
OpenVAS is comprised of a number of services and clients. By understanding the role of the different components you will be much better able to effectively administer OpenVAS servers.
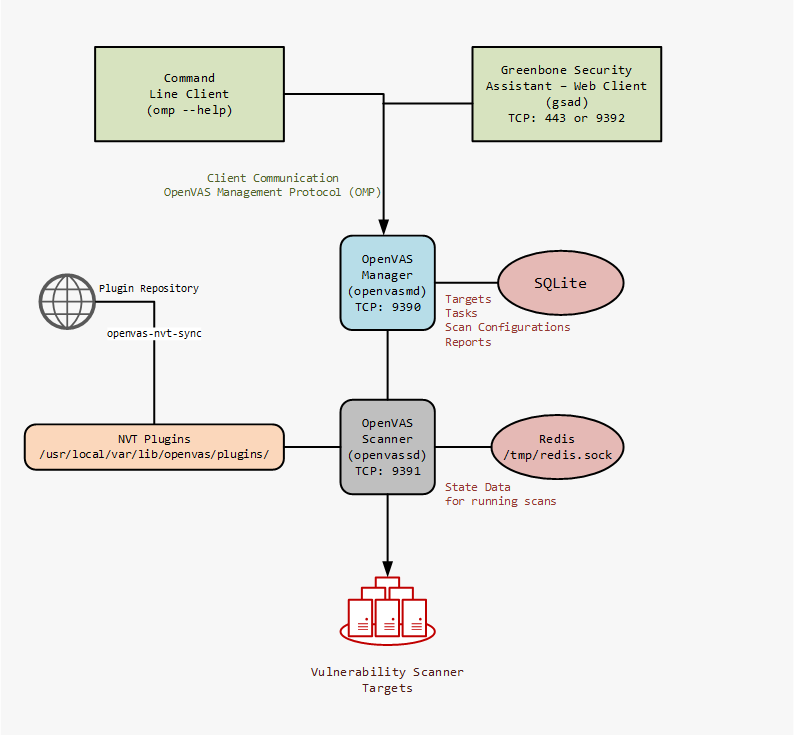
Communication from the client to the OpenVAS Manager is done using the OpenVAS Management Protocol (OMP).
What is an NVT?
NVT is Network Vulnerability Test. These are conducted using plugins that are developed in NASL code. The scripting language is a legacy of its original Nessus code base. NASL is the Nessus Attack Scripting Language, a scripting language for the testing of vulnerabilities first developed in 1998. With inspiration from the C programming language, non-coders wishing to develop a vulnerability test may be better served by Nmap and its LUA based NSE (Nmap Scripting Engvne) scripts.
On a typical OpenVAS server there will be tens of thousands of .nasl files. These are the vulnerability checks used by the OpenVAS scanner service. A guide to updating the NVT's can be found in this tutorial below.
Install OpenVAS on Ubuntu (PPA)
For those wishing to install OpenVAS on Ubuntu we have a complete "how to" installation guide available. This covers not only the base installation but also several optional additions to increase the effectiveness of our favorite vulnerability management solution.
Install OpenVAS on Kali (PPA)
The most famous of the Linux Penetration Testing distributions, Kali Linux, is a popular choice for quickly getting tools up and running as many are pre-installed and pre-configured.
Installing OpenVAS is very straightforward. Run the apt install and then run the configure script.
root@kali:~# apt-get update
root@kali:~# apt-get dist-upgrade

root@kali:~# apt-get install openvas
root@kali:~# openvas-setup
/var/lib/openvas/private/CA created
/var/lib/openvas/CA created

[i] This script synchronizes an NVT collection with the 'OpenVAS NVT Feed'.
[i] Online information about this feed: 'https://www.openvas.org/openvas-nvt-feed
...
sent 1052 bytes received 64342138 bytes 99231.26 bytes/sec
total size is 64342138 speedup is 1.00
[i] Initializing scap database
[i] Updating CPEs
[i] Updating /var/lib/openvas/scap-data/nvdcve-2.0-2002.xml
[i] Updating /var/lib/openvas/scap-data/nvdcve-2.0-2003.xml
...
Write out database with 1 new entries
Data Base Updated
Restarting Greenbone Security Assistant: gsad.
User created with password '* password that looks like uuid *'.
Install OpenVAS on Fedora (PPA)
From the official OpenVAS installation page getting up and running with Fedora is a few simple steps.
Note that these steps also apply for RHEL and CentOS.
Step 1: Configure Atomicorp Repository
wget -q -O - https://www.atomicorp.com/installers/atomic |sh
Step 2: Quick-Install OpenVAS (as user root, only once)
yum install openvas
openvas-setup
Step 3: Quick-Start OpenVAS
( nothing to do, all is up and running directly after installation )
Step 4: Log into OpenVAS with user created in the step 2
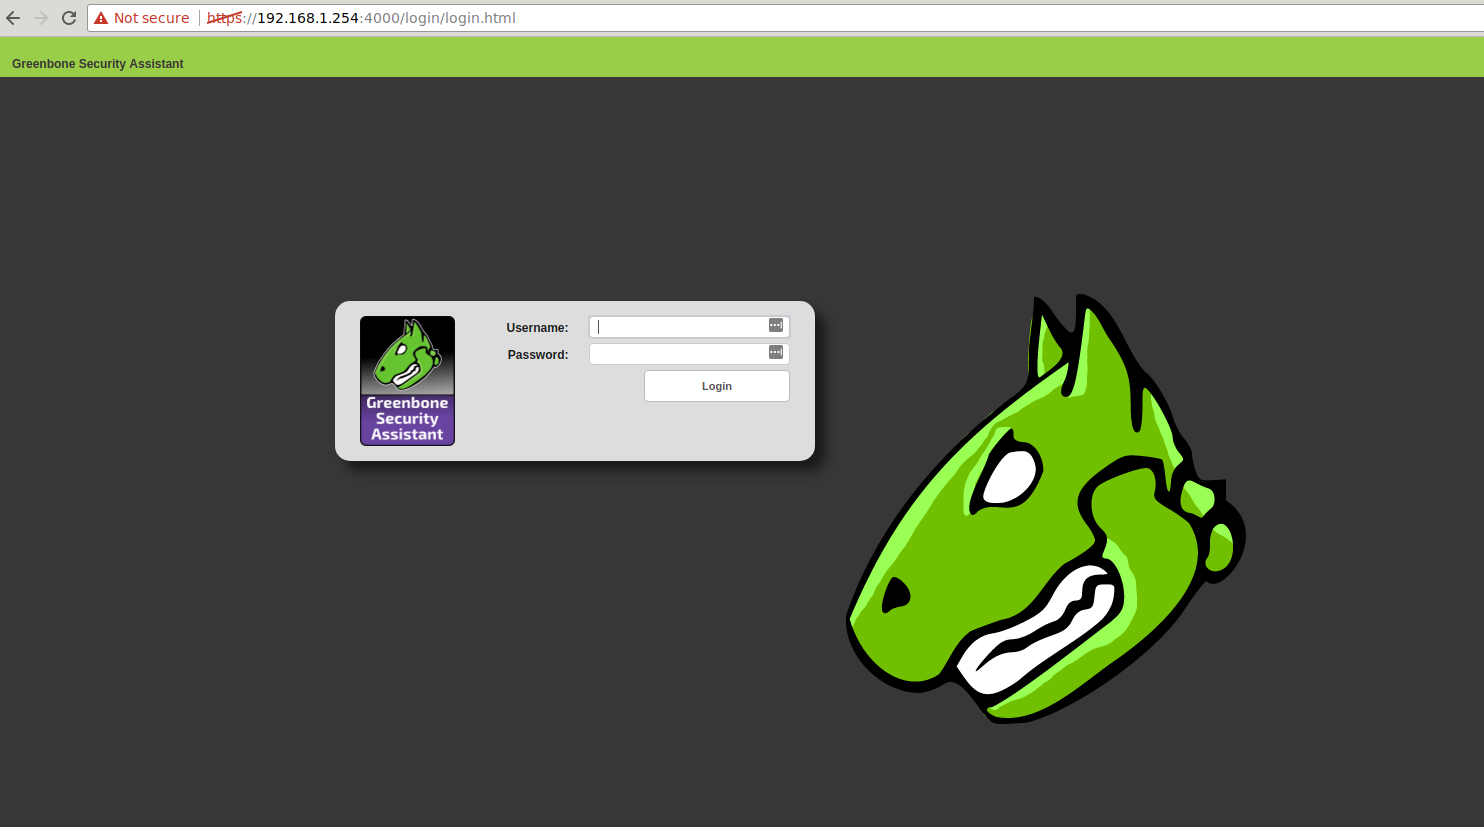
Open https://localhost:9392/
Install OpenVAS from Source
The advantage of installing from source is that you get the most up to date version of OpenVAS. In this source installation guide for Ubuntu we step through the steps of getting OpenVAS installed from source. Of course, depending on your Linux distribution, the required development packages will be different.
While the linked guide is specifically for OpenVAS 7 and Ubuntu, the basic process can be followed for other versions and distributions.
Accessing the OpenVAS Web Interface
The OpenVAS Web Interface (gsad) runs on TCP port 9392. However depending on your installation it could also be listening on TCP 443. After installation this can be confirmed by checking the listening ports on your system.
root@localhost:/# netstat -alnp | grep LISTEN

Active Internet connections (servers and established)
Proto Recv-Q Send-Q Local Address           Foreign Address         State       PID/Program name
tcp        0      0 127.0.0.1:6379          0.0.0.0:*               LISTEN      3692/redis-server 1
tcp        0      0 0.0.0.0:9391            0.0.0.0:*               LISTEN      13806/openvassd: Wa
tcp        0      0 0.0.0.0:1337            0.0.0.0:*               LISTEN      3656/sshd
tcp6       0      0 :::9390                 :::*                    LISTEN      13804/openvasmd
tcp6       0      0 :::443                  :::*                    LISTEN      28020/gsad
From these ports, we can see in our installation gsad is running on port 443. The OpenVAS Scanner (openvassd) is running on TCP Port 9391 and the OpenVAS Manager (openvasmd) is running on TCP port 9390. Lastly is the redis-server on TCP 6379. This database is used to store temporary meta data during active scanning.
Opening https://server-ip/ in our browser shows the login screen for the Greenbone Security Assistant.
Key File Locations of an OpenVAS Install
It is important to know the locations of your OpenVAS log files and configuration. This will allow faster troubleshooting and management of your server.
The prefix of the path will generally depend on how OpenVAS was installed. A default source installation will put all the files under /usr/local/ while most packages will put the files in the expected locations /etc/openvas/, /var/lib/openvas and /var/log/openvas/.
OpenVAS Log Files
The most common location will be /usr/local/var/log/openvas/ or /var/log/openvas/. In here you will find the key log files, where you should look if things are not behaving as expected.
root@localhost:~# ls /usr/local/var/log/openvas/
gsad.log
openvasmd.log
openvassd.dump
openvassd.messages
OpenVAS Configuration
The primary configuration file for the OpenVAS scanner is openvassd.conf, if this file is not present then default settings are used for all the available options.
Location of the file is usually /etc/openvas/ or /usr/local/etc/openvas/.
Check the current running configuration with this tip. Running openvassd -s on a server with openvassd running will result in the current configuration being shown. If the configuration file is not present these will be the default settings.
root@localhost:~# openvassd -s

plugins_folder = /usr/local/var/lib/openvas/plugins
cache_folder = /usr/local/var/cache/openvas
include_folders = /usr/local/var/lib/openvas/plugins
max_hosts = 30
max_checks = 10
be_nice = no
logfile = /usr/local/var/log/openvas/openvassd.messages
log_whole_attack = no
log_plugins_name_at_load = no
dumpfile = /usr/local/var/log/openvas/openvassd.dump
cgi_path = /cgi-bin:/scripts
optimize_test = yes
checks_read_timeout = 5
network_scan = no
non_simult_ports = 139, 445
plugins_timeout = 320
safe_checks = yes
auto_enable_dependencies = yes
use_mac_addr = no
nasl_no_signature_check = no
drop_privileges = no
unscanned_closed = yes
unscanned_closed_udp = yes
vhosts =
vhosts_ip =
report_host_details = yes
cert_file = /usr/local/var/lib/openvas/CA/servercert.pem
key_file = /usr/local/var/lib/openvas/private/CA/serverkey.pem
ca_file = /usr/local/var/lib/openvas/CA/cacert.pem
kb_location = /tmp/redis.sock
config_file = /usr/local/etc/openvas/openvassd.conf
If your build of OpenVAS does not include a default configuration file, you can use the output from openvassd -s. Simply redirect the output straight to your configuration location, and proceed with making changes to the configuration.
openvassd -s > /usr/local/etc/openvas/openvassd.conf
OpenVAS NVT Updates
The key command for updating NVT's on the system is openvas-nvt-sync. Ensure the full process below is followed. However, as without the rebuilding of the NVT cache /var/cache/openvas/, the new updated checks will not be used by the scanner.
root@localhost:~/# openvas-nvt-sync
After syncing the latest NVT's, it is necessary to have the OpenVAS manager update its NVT cache. This is done with the following:
openvasmd --update if the manager is running
or
openvasmd --rebuild with the manager stopped. This second option is much faster.
root@localhost:~/# ps -ef | grep openvas
** get the pid **
root@localhost:~/# kill $pid_of_openvassd
root@localhost:~/# kill $pid_of_openvasmd
root@localhost:~/# openvasmd --rebuild
root@localhost:~/# openvasmd
root@localhost:~/# openvassd
root@localhost:~/# ps -ef | grep openvas
root     13804     1  7 Nov10 ?        05:56:12 openvasmd
root     13806     1  0 Nov10 ?        00:02:12 openvassd: Waiting for incoming connections
With the above process output we can see that the update has been successful. The Scanner and Manager are ready to start scanning.
Command Line OpenVAS Scanning with OMP
Usually required for automating OpenVAS scans, the command line client (omp) for OpenVAS allows you to turn the system into custom solution for your own needs.
The omp command has a large number of options. A nice feature is the ability to save your connection credentials into a file so they don't have to be repeated on the command line.
[Connection]
host=127.0.0.1
port=9390
username=hackertarget
password=yeahright
While there are a number of shortcuts that can be used as command line parameters, for full control the XML option is the go to option. This gives you full control over the system.
root@localhost:~# omp --help Usage: omp [OPTION...] - OpenVAS OMP Command Line Interface Help Options: -?, --help Show help options Application Options: -h, --host=Connect to manager on host -p, --port= Use port number -V, --version Print version. -v, --verbose Verbose messages (WARNING: may reveal passwords). --use-certs Use client certificates to authenticate. --client-cert= Client certificate. Default: /usr/local/var/lib/openvas/CA/clientcert.pem --client-key= Client key. Default: /usr/local/var/lib/openvas/private/CA/clientkey.pem --client-ca-cert= Client CA certificate. Default: /usr/local/var/lib/openvas/CA/cacert.pem -u, --username= OMP username -w, --password= OMP password --config-file= Configuration file for connection parameters. -P, --prompt Prompt to exit. -O, --get-omp-version Print OMP version. -n, --name= Name for create-task. -C, --create-task Create a task. -m, --comment= Comment for create-task. -c, --config= Config for create-task. -t, --target= Target for create-task. -E, --delete-report Delete one or more reports. -D, --delete-task Delete one or more tasks. -R, --get-report Get report of one task. -F, --get-report-formats Get report formats. (OMP 2.0 only) -f, --format= Format for get-report. --filter= Filter string for get-report -G, --get-tasks Get status of one, many or all tasks. -g, --get-configs Get configs. -T, --get-targets Get targets. -i, --pretty-print In combination with -X, pretty print the response. -S, --start-task Start one or more tasks. -M, --modify-task Modify a task. --ping Ping OMP server --timeout= Wait seconds for OMP ping response --file Add text in stdin as file on task. -X, --xml= XML command (e.g. " "). "-" to read from stdin. --send-file= Replace SENDFILE in xml with base64 offile. --details Enable detailed view.
A very simple example of sending an XML query using the omp client is to actually ask for help. The response from this command gives details of other possible XML queries.
omp --xml=""
Starting a Scan from the Command Line
As a quick introduction, the process for starting a scan from the command line involves: Getting a list of targets or tasks can be done with XML queries. Once the scan has completed, retrieve the report using the Initially this may seem a bit overwhelming however, it is quite logical once you step through the process. Don't forget to use the query commands to get the different target / task / report / format identifiers as you go through the process. Whether you wish to troubleshoot an NVT that is not working or test a single vulnerability, the The following error is a common occurrence when attempting to run the command. This is due to a failure in the signature check as shown in the error. Fixing it is mostly straight forward. Note in the test command we have used the Full details of the Trusted NVT's is available.However, so we can get on with our testing, we will jump into creating a private key, importing the OpenVAS plugin key and signing. Answer the questions as required to create your keyring and key. Then grab the official OpenVAS Transfer key.
Final step is to get things signed.
Now we have all the GPG signing sorted, lets try our test again. That looks much better. Now we can test against a target. Keep in mind that we are running these plugins standalone from the OpenVAS manager so the target ID's from the command line section are not relevant. Our target is simply the target host or IP address. Doh! Almost there. This error is indicating that the plugin requires In addition, we can use After running OpenVAS a number of years, this is an issue I have stumbled across more than once. The different OpenVAS components have certificates for encrypting the communication between components (including clients). These certificates expire and when that happens things break. The Manager can't talk to the Scanner for example. The first error you may see is something like "503 service temporary down / unavailable". Checking the OpenVAS Manager log file will reveal. So lets create new certificates for both server and clients.
And now for the client certificates. This is from the INSTALL file for the OpenVAS manager, however after doing this the database failed to rebuild and the log showed an authentication error: What was required was to register the new certificates with the OpenVAS manager. To do this I ran the following commands: Following this, everything is back on track. Redis contains data known as the KB. This is a store of information related to current scan tasks. The Redis server is accessed by OpenVAS using a unix socket It is possible to monitor data going into the Redis KB using the standard Redis monitoring command. OpenVAS is a highly capable and powerful vulnerability testing solution. Hopefully, this tutorial and included tips will prove useful to users out there. The team at Greenbone Networks, along with the community and other supporters, have done a fantastic job building OpenVAS. The latest version has a range of excellent new features and optimisations that have been a big step forward. For some of these items, I have only scratched the surface. Use the information here as pointers to allow you to dig deeper into the OpenVAS system. There is a lot of good information available on the OpenVAS site and from the mailing list archive. Another often overlooked location for further information is the Vulnerability Scans and Network Intelligence Enumerate and Discover 28 vulnerability scanners and network tools
1. Create Target (--xml="
2. Create Task (use -C and the option --config=ID of your scan config, also requires --target=ID of target)
3. Start Task (--xml="
4. Get Report (--xml="/usr/local/openvas/bin/omp --pretty-print --xml "
get_reports XML. Requires the report_id and the format_id parameters.Test a Single OpenVAS NVT (nasl) Plugin
openvas-nasl command is your friend. This handy tool allows quick checks and debugging of broken plugins.root@localhost:~# openvas-nasl --help
Usage:
openvas-nasl [OPTION...] NASL_FILE... - standalone NASL interpreter for OpenVAS
Help Options:
-h, --help Show help options
Application Options:
-V, --version Display version information
-d, --debug Output debug information to stderr.
-D, --description Only run the 'description' part of the script
-B, --both Run in description mode before running the script.
-p, --parse Only parse the script, don't execute it
-L, --lint 'lint' the script (extended checks)
-t, --target=
root@localhost:~# openvas-nasl -p /usr/local/var/lib/openvas/plugins/http_version.nasl

base gpgme-Message: Setting GnuPG homedir to '/usr/local/var/lib/openvas/gnupg'
base gpgme-Message: Using OpenPGP engine version '1.4.16'
base gpgme-Message: Setting GnuPG sysconf homedir to '/usr/local/etc/openvas/gnupg'
http_version.nasl: bad or missing signature. Will not execute this script
-p parameter. This is a good way to test things out as it attempts to parse the nasl script and will reveal any errors or other problems (such as missing signatures).root@localhost:~# gpg --homedir=/usr/local/etc/openvas/gnupg --gen-key
root@localhost:~# wget https://www.openvas.org/OpenVAS_TI.asc
root@localhost:~# gpg --homedir=/usr/local/etc/openvas/gnupg --import OpenVAS_TI.asc
root@localhost:~# gpg --homedir=/usr/local/etc/openvas/gnupg --lsign-key 48DB4530

pub 1024D/48DB4530 created: 2007-11-05 expires: never usage: SC
  trust: unknown validity: unknown
sub 2048g/70610CFB created: 2007-11-05 expires: never usage: E
[ unknown] (1). OpenVAS Transfer Integrity

pub 1024D/48DB4530 created: 2007-11-05 expires: never usage: SC
  trust: unknown validity: unknown
 Primary key fingerprint: C3B4 XXXX 288C XXXXX D526 XXXX 4847 XXXXX 48DB 4530

  OpenVAS Transfer Integrity

Are you sure that you want to sign this key with your
key "OpenVAS Test" (***)

The signature will be marked as non-exportable.

Really sign? (y/N) y
root@localhost:~# openvas-nasl -p /usr/local/var/lib/openvas/plugins/http_version.nasl
base gpgme-Message: Setting GnuPG homedir to '/usr/local/var/lib/openvas/gnupg'
base gpgme-Message: Using OpenPGP engine version '1.4.16'
base gpgme-Message: Setting GnuPG sysconf homedir to '/usr/local/etc/openvas/gnupg'
root@localhost:~# openvas-nasl -p /usr/local/var/lib/openvas/plugins/pre2008/http_methods.nasl
base gpgme-Message: Setting GnuPG homedir to '/usr/local/var/lib/openvas/gnupg'
base gpgme-Message: Using OpenPGP engine version '1.4.16'
base gpgme-Message: Setting GnuPG sysconf homedir to '/usr/local/etc/openvas/gnupg'
http_func.inc: Not able to open nor to locate it in include paths
/usr/local/var/lib/openvas/plugins/pre2008/http_methods.nasl: Parse error at or near line 80
http_func.inc and it can not be found. We need to indicate the location of the plugin directory to the openvas-nasl command.root@localhost:/# openvas-nasl -i /usr/local/var/lib/openvas/plugins/ -t hackertarget.com /usr/local/var/lib/openvas/plugins/http_version.nasl
base gpgme-Message: Setting GnuPG homedir to '/usr/local/var/lib/openvas/gnupg'
base gpgme-Message: Using OpenPGP engine version '1.4.16'
base gpgme-Message: Setting GnuPG sysconf homedir to '/usr/local/etc/openvas/gnupg'
The remote web server type is :
nginx/1.10.3 (Ubuntu)
-d, the debug option to get more information.Updating Client and Server Certificates
from /var/log/openvas/openvasmd.log

lib  serv:WARNING:2017-06-21 05h32.56 UTC: openvas_server_verify: the certificate is not trusted
lib  serv:WARNING:2017-06-21 05h32.56 UTC: openvas_server_verify: the certificate has expired
root@localhost: ~# openvas-mkcert -f

-------------------------------------------------------------------------------
  Creation of the OpenVAS SSL Certificate
-------------------------------------------------------------------------------

Congratulations. Your server certificate was properly created.

The following files were created:

. Certification authority:
  Certificate = /usr/local/var/lib/openvas/CA/cacert.pem
  Private key = /usr/local/var/lib/openvas/private/CA/cakey.pem

. OpenVAS Server :
  Certificate = /usr/local/var/lib/openvas/CA/servercert.pem
  Private key = /usr/local/var/lib/openvas/private/CA/serverkey.pem

Press [ENTER] to exit
root@localhost: ~# openvas-mkcert-client -n -i

Generating RSA private key, 4096 bit long modulus
....................................................................................................++
................................++
e is 65537 (0x10001)
You are about to be asked to enter information that will be incorporated
into your certificate request.
What you are about to enter is what is called a Distinguished Name or a DN.
There are quite a few fields but you can leave some blank
For some fields there will be a default value,
If you enter '.', the field will be left blank.
-----
Country Name (2 letter code) [DE]:
State or Province Name (full name) [Some-State]:
Locality Name (eg, city) []:
Organization Name (eg, company) [Internet Widgits Pty Ltd]:
Organizational Unit Name (eg, section) []:
Common Name (eg, your name or your server's hostname) []:
Email Address []:
Using configuration from /tmp/openvas-mkcert-client.445/stdC.cnf
Check that the request matches the signature
Signature ok
The Subject's Distinguished Name is as follows
countryName :PRINTABLE:'AU'
localityName :PRINTABLE:'Sydney'
commonName :PRINTABLE:'om'
Certificate is to be certified until Nov 10 22:28:26 2018 GMT (365 days)

Write out database with 1 new entries
Data Base Updated
lib serv:WARNING:2017-11-10 22h07.27 utc:12817: openvas_server_connect: failed to connect to server: Connection refused
lib auth: INFO:2017-11-10 22h07.31 utc:12819: Authentication configuration not found.
root@localhost: ~# openvasmd --get-scanners
* uuid is shown here*
root@localhost: ~# openvasmd --modify-scanner
Monitoring the OpenVAS Redis Instance
/tmp/redis.sock.redis-cli -s /tmp/redis.sock
Conclusion
man pages for the openvassd and openvasmd servers.
Know the Network