Understand the Port Scanning Process with this
Nmap Tutorial
With a basic understanding of IP addresses and service ports, this tutorial will walk you through installing Nmap, running your first scans, and understanding how Nmap works at the packet level, why ports show as open, closed, or filtered, and how to interpret what you're seeing.
Nmap is the world's leading port scanner, and a core part of our hosted security tools. Our
online Nmap port scanner can scan your perimeter devices and servers from an external perspective the same way
an attacker sees your network.
Getting started with Nmap
Operating System
Nmap runs on all major platforms but performs best on Linux. Examples in this tutorial use Ubuntu, though the same commands work with Fedora and FreeBSD with only minor changes.
Windows users can run Nmap via the official installer, but many prefer WSL2 which provides full Linux functionality without leaving Windows.
Install Nmap From Source
Package managers are convenient but often lag behind the official Nmap releases by months (sometimes years). Building from source gives you the latest Nmap release immediately.
Building from source also gives you:
The newest OS and service fingerprints
Updated NSE scripts
Performance improvements not yet packaged by your distro
Download the latest stable tarball from the official Nmap download page:
https://nmap.org/download.html, or fetch it directly from the terminal:
wget https://nmap.org/dist/nmap-7.98.tar.bz2
The tarball will download to your current directory so you can extract and build it immediately.
Next, install any dependencies required to build Nmap, such as g++ in order to compile and libssl-dev package as this will enable the SSL testing NSE scripts to work.
sudo apt update
sudo apt install g++ libssl-dev
Now unpack, configure, compile and install. Use the standard configure and make commands .
bzip2 -cd nmap-7.98.tar.bz2 | tar xvf -
cd nmap-7.98/
./configure
make
sudo make install
Verify the installation has been successful with:
nmap --version
Installing from source places Nmap binaries under /usr/local/bin, which takes priority over the distro package version in /usr/bin. This is expected and allows you to keep both versions if needed.
Tip: To confirm you're using the compiled version rather than your package manager’s Nmap run:
which nmap
#This should print
/usr/local/bin/nmap
Alternative: Install via Package Manager
While installing from source is the best way to ensure you're running the latest Nmap release, every major Linux distribution also provides Nmap through its package manager and provides a quick fallback so you can continue with the tutorial.
Check your distro’s version with:
sudo apt update
apt show nmap
Compare version to the latest stable version
Package: nmap
Version: 7.91+dfsg1+really7.80+dfsg1-2ubuntu0.1
...
If suitable then install and verify with:
sudo apt install nmap
nmap --version
Optional Ways to Run Nmap: VMs, Containers, VPS
You don’t need any of these to follow this tutorial, but they reflect how Nmap is used in real environments.
Virtual Machines
If you are not running Linux, the simplest setup is to run Ubuntu inside a virtual machine such as VirtualBox or VMware. A VM gives you an isolated environment where you can install tools, experiment freely and take snapshots without touching your base system.
Tip: Use bridged networking so your VM receives its own IP address on your LAN. This makes it easy to scan between the VM, your host operating system, and other devices during testing. Only scan systems you own or have permission to test.
Containers
While you can get containers with Nmap preinstalled from the Docker hub, start from a trusted Ubuntu base and install Nmap in your Dockerfile.
Build the image
docker build -t my-nmap .
To run a basic scan
docker run --rm my-nmap scanme.nmap.org
Version & Service detection
docker run --rm my-nmap -sV -p 80,443 example.com
VPS for External Scans
For perimeter testing or remote scanning (similar to what our online Nmap scanner provides), a small Ubuntu VPS works extremely well. It gives you a clean, dedicated host to scan from an external perspective, matching what an attacker would see. Providers such as DigitalOcean or Akamai Cloud offer low-cost instances suitable for this purpose.
First Scan: Discover Live Hosts on Your Network
Do you need sudo for Nmap?
Unlike most programs where sudo just grants permission to run, Nmap uses sudo to access low-level networking capabilities that require root privileges that enable faster, more accurate, and lower-impact scanning. Without it, Nmap still works but falls back to slower, noisier methods (scans that complete the full TCP connections), are more likely to be detected and logged. E.g More visible TCP connect scans may show a message like:
"You requested a SYN stealth scan (-sS) but did not provide sudo - using TCP connect scan (-sT) instead."
A good starting point is to discover which hosts are live on your local network. Warning: Only scan networks and hosts you own or are authorised to test.
sudo nmap -sn 192.168.1.0/24
This performs a quick host discovery scan across your local network (192.168.1.0–254).
The -sn flag disables port scanning and only checks which hosts are up, making this fast and low-noise.
Without sudo, host discovery may rely more on TCP probes and can miss hosts depending on firewalling.
Example output
Starting Nmap 7.98 ( https://nmap.org ) at 2025-12-04 14:23 AEDT
Nmap scan report for router.home (192.168.1.1)
Host is up (0.0012s  latency).
MAC Address: A4:91:B1:2C:5D:8E  (TP-Link Technologies)

Nmap scan report for 192.168.1.15
Host is up (0.045s latency).
MAC Address: B8:27:EB:A3:F2:1C (Raspberry Pi Foundation)

Nmap scan report for 192.168.1.10
Host is up (0.0045s latency).
MAC Address: 3C:5A:B4:77:21:9C (Dell Inc.)

Nmap done: 256 IP addresses (3 hosts up) scanned in 3.29 seconds
How to interpret the above results:
• IP/Hostname: identifies each discovered device.
• Latency: lower = wired, higher = Wi-Fi.
• MAC Vendor: helps recognise device type (PC, phone, IoT).
• Missing hosts: offline, isolated, or blocking probes.
Understanding Open, Closed and Filtered Ports
Before moving on to deeper scans, it is important to understand how Nmap classifies port states. These states are inferred from how the target responds (or fails to respond) to probe packets. Understanding how the default and most common SYN scan works is a good place to start to examine how the scan works and interpreting the results.
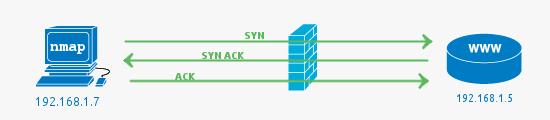
The 3 way TCP handshake
First, a bit of background, during communication with a TCP service, a single connection is established with the TCP 3 way handshake. This involves a SYN sent to an open TCP port that has a service bound to it, typical examples are HTTP (port 80), SMTP (port 25), POP3 (port 110) or SSH (port 22).
The server side will see the SYN and respond with SYN ACK, with the client answering the SYN ACK with an ACK. This completes the set up and the data of the service protocol can now be communicated.
In the above example, the firewall passes the traffic to the web server (HTTP -> 80) and the web server responds with the acknowledgement.
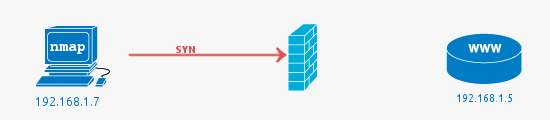
Filtered ports or when the Firewall drops a packet
In all these examples, a firewall could be a separate hardware device, or it could be a local software firewall on the host computer.
The job of a firewall is to protect a system from unwanted packets that could harm the system. In this simple example, the port scan is conducted against port 81, as there is no service running on this port, using a firewall to block access to it is best practice.
A filtered port result from Nmap indicates that the port has not responded at all. The SYN packet has simply been dropped by the firewall. See the following Wireshark packet capture that shows the initial packet with no response.
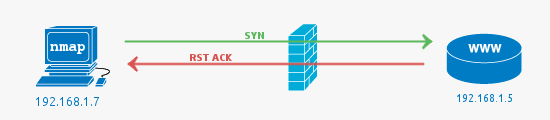
Closed ports or when the Firewall fails
In this case, closed ports most commonly indicate there is no service running on the port, but the firewall has allowed the connection to go through to the server. It can also mean no firewall is present at all.
Note that while we are discussing the most common scenarios, it is possible to configure a firewall to reject packets rather than drop. This would mean packets hitting the firewall would be seen as closed (the firewall is responding with RST ACK).
Pictured below is a case where a firewall rule allows the packet on port 81 through even though there is no service listening on the port. This is most likely because the firewall is poorly configured.
An Open Port (service) is found
Open Ports are usually what you are looking for when kicking off Nmap scans. The open service could be a publicly accessible service that is, by its nature, supposed to be accessible. It may be a back-end service that does not need to be publicly accessible, and therefore should be blocked by a firewall.
An interesting thing to notice in the Wireshark capture is the RST packet sent after accepting the SYN ACK from the web server. The RST is sent by Nmap as the state of the port (open) has been determined by the SYN ACK if we were looking for further information such as the HTTP service version or to get the page, the RST would not be sent. A full connection would be established.
Port State Summary
Port State
What it means
open
A service is listening on this port and responding to probes.
closed
No service is listening, but the host is reachable and responds with a reset (RST).
filtered
Nmap cannot determine whether the port is open because packet filters (firewalls, ACLs)
are dropping the probes. Typically there is no response at all.
open|filtered
Nmap cannot distinguish between open and filtered (e.g. with some UDP and firewall combinations).
closed|filtered
Nmap cannot determine whether the port is closed or filtered due to confusing or inconsistent responses.
Service scan of a host (-sV)
Once you've identified the live hosts, choose one IP from the results to inspect in more detail. Below shows the result of a scan of one of the hosts discovered in the previous -sn sweep.
sudo nmap -sV 192.168.1.1
This scans the top 1,000 most common ports and identifies service versions with -sV.
Example output
Starting Nmap 7.98 ( https://nmap.org ) at 2025-12-04 14:25 AEDT
Nmap scan report for router.home (192.168.1.1)
Host is up (0.0011s latency).
Not shown: 996 closed tcp ports (reset)
PORT    STATE SERVICE  VERSION
22/tcp  open  ssh      OpenSSH 8.2p1 Ubuntu 4ubuntu0.5 (Ubuntu Linux; protocol 2.0)
53/tcp  open  domain   dnsmasq 2.80
80/tcp  open  http     nginx 1.18.0
443/tcp open  ssl/http nginx 1.18.0
MAC Address: A4:91:B1:2C:5D:8E (TP-Link Technologies)
Service Info: OS: Linux; CPE: cpe:/o:linux:linux_kernel

Service detection performed. Please report any incorrect results at https://nmap.org/submit/ .
Nmap done: 1 IP address (1 host up) scanned in 12.43 seconds
How to interpret the above result:
• Host is up confirms the target is reachable.
• Closed ports: host reachable but nothing listening.
• Open ports: reveal active services and versions.
• Service and version information (OpenSSH, dnsmasq, nginx) can be mapped against advisories and CVEs.
• MAC vendor often reveals device type (router, PC, IoT).
External perspective:
Local scans show you what is reachable from inside your network. To understand what is exposed to the internet, our online Nmap port scanner runs the same techniques from an external host, giving the same view an attacker starts with.
Full Port Scan of a Single Host (-p-)
For a comprehensive scan of all 65,535 ports on a single host :
sudo nmap -sV-p- 192.168.1.20
A full port scan of a single host (like in the example above) normally takes 10–20 minutes, depending on latency and firewall configurations.
Note: Because full port scans take 10-20 minutes per host, scanning an entire /24 network (256 hosts) with -p- would take days. Run -p- only on the interesting targets, or where you need complete visibility.
Example output
Starting Nmap 7.98 ( https://nmap.org ) at 2025-12-04 14:45 AEDT
Nmap scan report for desktop.home (192.168.1.20)
Host is up (0.0019s latency).
Not shown: 994 closed tcp ports (reset)
PORT STATE SERVICE VERSION
22/tcp open ssh OpenSSH 9.2p1 Debian 2+deb12u1 (protocol 2.0)
80/tcp filtered http139/tcp open netbios-ssn Samba smbd 4.17.12-Debian (workgroup: WORKGROUP)
445/tcp open netbios-ssn Samba smbd 4.17.12-Debian (workgroup: WORKGROUP)
3389/tcp open ms-wbt-server xrdp5900/tcp open vnc VNC (protocol 3.8)
MAC Address: 00:1A:2B:3C:4D:5E (Intel Corporate)
Service Info: Host: DESKTOP; OS: Linux; CPE: cpe:/o:linux:linux_kernel
Service detection performed. Please report any incorrect results at https://nmap.org/submit/ .
Nmap done: 1 IP address (1 host up) scanned in 12 minutes
Interpreting this result:
• Open SSH (22/tcp) provides shell access and should be hardened or limited to trusted networks.
• Filtered HTTP (80/tcp) indicates a firewall or filter blocking access to that service from your vantage point.
• NetBIOS/SMB (139, 445) exposes file sharing; dangerous if reachable from untrusted networks.
• 3389 (RDP-like) and 5900 (VNC) are remote-desktop style services; strong authentication and network controls are critical.
• The combination of services and MAC vendor points to a desktop or workstation with multiple remote-access paths.
Speed Up Scans with Timing Templates
Nmap timing templates control how aggressively probes are sent. Faster templates complete scans sooner but increase network load and the chance of dropped or missed responses.
For faster scans on networks you own and control, -T4 is commonly used:
sudo nmap -sV -T4 192.168.1.10
-T0 to -T2: Very slow, minimal traffic, useful on fragile networks or when rate limits exist
-T3: Default timing, balanced speed and reliability
-T4: Faster scanning, suitable for trusted internal networks
-T5: Extremely aggressive, may miss ports or overwhelm targets. Rarely recommended
Note: Slower timing does not guarantee stealth. Modern IDS/IPS systems often detect both fast and slow scans.
Hacking Nmap Video from Defcon 13
And below, a reminder from Defcon that reconnaissance is an art that never goes out of style.
This video contains some interesting Nmap features, the presenter is Fyodor the creator of the Nmap port scanner.
Become an expert with the ultimate Nmap reference book
Common Nmap Use Cases
Here are six common ways to use Nmap for network security. Each one includes the commands to run, what to look for in the results, and what to do if you find issues.
Scan My Home Network
Discover all devices connected to your Wi-Fi and check for open ports.
Step 1: Find all devices
sudo nmap -sn 192.168.1.0/24
What this does: Discovers which IP addresses are active on your network without scanning ports. This is fast (under 5 seconds for most home networks) and low-noise.
Unknown MAC addresses that might indicate unauthorized access.
Devices you don't recognize by hostname
Step 2: Deep scan a specific device
sudo nmap -sV -p- 192.168.1.15
What this does: Scans all 65,535 TCP ports on a single target (eg the device you found in Step 1) and attempts to identify what services are running. This takes 10-20 minutes per host.
What you're looking for:
Unexpected open ports (why is port 23 or 3389 open on your IoT device?)
Services that shouldn't be accessible (databases, admin panels)
Outdated software versions that may have known vulnerabilities
Red flags: Telnet (23), unencrypted VNC (5900), or RDP (3389) open on IoT devices.
Check Server Ports
Quickly verify if web, SSH, or database ports are open on your external perimeter.
Quick single-port check
nmap -p 80 example.com
What this does: Checks if TCP Port 80 is reachable from the internet. This is a fast connectivity test, not a security assessment.
Multi-port verification
nmap -p 22,80,443 example.com
What this does: Checks whether common service ports (SSH, HTTP, HTTPS) are responding as expected.
What you're looking for:
Port 80 and 443 open = web server accessible
Port 22 filtered or closed = SSH not exposed to internet (good for security)
Port 443 closed but 80 open = you're serving HTTP without HTTPS (security issue)
When to run this: After firewall changes, after deploying or migrating services, or as part of routine external perimeter checks.
Tip: Run this from an external VPS or use our online Nmap scanner to see what your perimeter looks like. Internal scans often won't show firewall filtering and won't reflect what attackers can reach.
Internal Attack Surface Mapping
Map the internal network to identify live hosts, exposed services, and operating systems.
Legal requirement: Only scan networks you own or have explicit permission to test. Unauthorized scanning can have serious legal consequences.
-sC: Runs default NSE scripts (checks for common misconfigurations)
-O: Attempts OS fingerprinting
-oA: Saves results in three formats (normal, XML, greppable)
Time estimate: 30-60 minutes for a /24 network, depending on a number of things such as number of live hosts and firewall configurations.
What you're looking for:
Asset inventory (what's actually on your network vs. what should be)
Unpatched services with known CVEs
Shadow IT (unauthorized servers or services)
Default credentials or test systems still online
After the scan: Results are saved with the prefix example-map-2025-12-12. You'll have three files:
.nmap = human-readable
.xml = import into vulnerability scanners
.gnmap = easy to grep/parse with scripts
Critical follow-up: Any open port without a clear owner or documented purpose should be treated as a security finding.
Check IoT Devices
Scan smart devices (cameras, lights) for dangerous defaults.
Scan common IoT service ports
sudo nmap -sV -p 23,80,554,8080,8443 192.168.1.50
What this does: Targets the ports most commonly used by security cameras, smart TVs, home automation hubs, and network-connected appliances.
What each port means:
Port 23 (Telnet) = Unencrypted remote access. If this is open, credentials are transmitted in plain text when used.
Port 80 (HTTP) = Web interface, usually for configuration. Check if it requires authentication.
Port 554 (RTSP) = Video streaming protocol. If open without authentication, your camera feed may be publicly accessible.
Port 8080/8443 = Alternative web interfaces, common on IoT devices.
What you're looking for:
Any device with port 23 open should be replaced if possible or isolated at minimum
Web interfaces (80, 8080, 8443) that don't require login
Default credentials still active (admin/admin, admin/password)
Immediate actions if you find issues:
Change default passwords to strong, unique credentials
Disable Telnet if possible, use SSH instead
Put IoT devices on a separate VLAN isolated from your main network
Check manufacturer website for firmware updates
Real risk: IoT devices are frequently compromised. Finding port 23 open indicates the device is either outdated or poorly managed. Telnet is an obsolete protocol that transmits credentials in plain text.
Website Security
Check SSL/TLS, HTTP headers, and common web vulnerabilities.
What this does: Runs a selection of Nmap NSE HTTP scripts against ports 80/443. These scripts can flag known vulnerable patterns and common misconfigurations, but coverage varies by script and results should be validated.
What you're looking for:
Outdated software with published exploits
Missing security headers
SSL/TLS configuration weaknesses
Default pages or test scripts still accessible
Common web vulnerability scripts:
http-vuln-cve* = checks for specific known CVEs using targeted signatures (where a script exists).
http-csrf = looks for missing or weak CSRF protections on common endpoints (not definitive).
http-stored-xss = basic checks for potential reflected/stored XSS indicators.
Important: These scripts identify low-hanging fruit and common misconfigurations. Results should be treated as indicators, not proof of exploitable vulnerabilities. False positives/negatives happen, confirm findings with manual testing or a dedicated web scanner
Follow-up: If this scan finds vulnerabilities, run a proper web application scanner (Burp Suite, OWASP ZAP).
Database Check
Verify your database isn't exposed to the internet.
Scan common database ports from external perspective
nmap -Pn -p 3306,5432,1433,27017 your-external-ip
What this does: Checks whether database ports are exposed to the internet. The -Pn flag skips host discovery (useful when ICMP is blocked by firewalls).
What each port represents:
3306 = MySQL/MariaDB
5432 = PostgreSQL
1433 = Microsoft SQL Server
27017 = MongoDB
What you WANT to see: All ports: filtered (or no response)
This means your firewall is blocking database access from the internet.
What you DON'T want to see: 3306/tcp open mysql
This means your database is directly accessible to the internet. This is a critical security issue.
If ports show as open:
Immediate action: Add firewall rules to block these ports from external access
Verify your database is not using default credentials
Check logs for unauthorized connection attempts
Ensure your application connects via internal network, not public IP
Best practice: Databases should NEVER be directly accessible from the internet. Always access them through:
VPN for administrative access
Application servers that proxy requests
SSH tunnels for development work
Exposed databases are a target for data breaches. Even with authentication, having them internet-facing dramatically increases your attack surface.
Conclusion
By learning how Nmap discovers hosts, classifies port states, and identifies services, you can move from running scans to interpreting results and create a map of what's exposed on your network.
If you’re scanning regularly, keep a fast reference close by. The Nmap Cheatsheet (2025) provides common flags, timing options, port ranges, and scan patterns without needing to search documentation mid-task.
For external visibility, internal scans are not enough. To see what your perimeter looks like from the internet, use our online Nmap port scanner, which runs the same techniques from an external position, the same way exposed services are discovered in real-world reconnaissance.
Know Your Attack Surface
Targeted End Point Discovery & Vulnerability Identification.