![]() OSSEC is easy to use and provides a high level of system surveillance for a small amount of effort.
OSSEC is easy to use and provides a high level of system surveillance for a small amount of effort. OSSEC is a Host-based Intrusion Detection System (HIDS). Using a HIDS allows you to have real time visibility into what security events are taking place on a server.
Best practice security management calls for a layered approach to security. Security vulnerability scanning, firewall, strong passwords, patch management, and intrusion detection capabilities are all important layers.
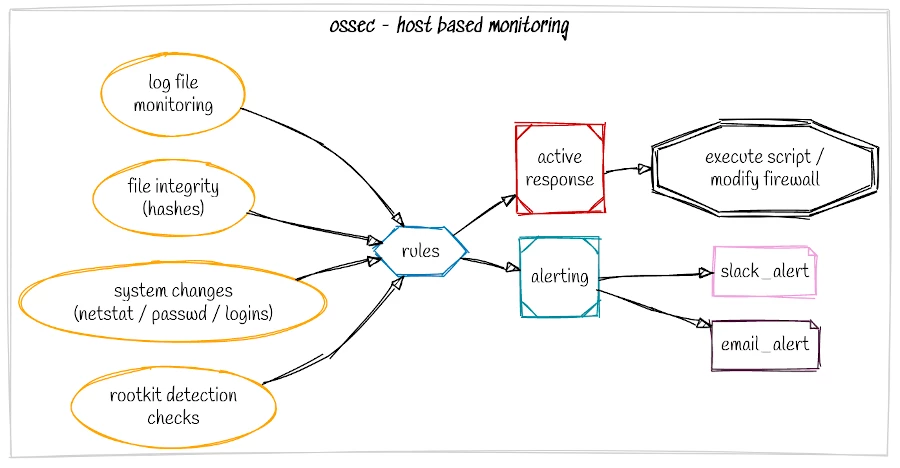
OSSEC provides several functions
- Real time log monitoring.
- File integrity checking - detects changes to files and system paths.
- Rootkit detection.
- Changes to the system / running services (netstat) / disk space / password file changes.
- Real time blocking of detected attacks through firewall rule modification.
- Execute arbitrary commands based on specific events.
At the most basic level you can install OSSEC, set an email address and let it do its job alerting you to security related events on your server. It has minimal cpu impact and is great bang for buck. More advanced alerting options are available using Slack or sending logs to a SIEM or centralised security management platform.
Tuning is straight forward. You will likely only need to tune out a few things to minimise the amount of alerts you receive as generally the rate of false positives is very low.
tar archive from the ossec site and get started.Quick guide to installing on Ubuntu
Updated 22nd March 2020 to include new libraries (libevent, libpcre2, zlib, openssl) required for the latest versions of OSSEC. Installation was tested with OSSEC 3.6.0 on Ubuntu 18.04 (should also work on Ubuntu 20.04).
user@test:~/ossec-3.6.0/$ sudo apt install libevent-dev
user@test:~/ossec-3.6.0/$ sudo apt install libpcre2-dev
user@test:~/ossec-3.6.0/$ sudo apt install zlib1g-dev
user@test:~/ossec-3.6.0/$ sudo apt install libssl-dev
Now for the installation. For the fastest way to get started select local as the installation type, enter your SMTP server and email, then follow the defaults. This will provide a working installation that will email you when something out of the ordinary occurs. From here you can move onto tuning the local_rules for your environment.
wget https://github.com/ossec/ossec-hids/archive/3.6.0.tar.gz

user@test:~/ossec-3.6.0/$ tar zxvf 3.6.0.tar.gz
user@test:~/ossec-3.6.0/$ cd ossec-hids-3.6.0
user@test:~/ossec-3.6.0/$ sudo ./install.sh


1. What kind of installation do you want (server, agent, local or help)?  local

* If you are doing a basic install to a single server select 'local'.
This creates a single install to monitor only the server you are
installing on. See the documentation on the site for details on
setting up multiple agents on a number of servers that all report back
to a server.

2- Setting up the installation environment.

 - Choose where to install the OSSEC HIDS [/var/ossec]:

   - Installation will be made at  /var/ossec .

3- Configuring the OSSEC HIDS.

 3.1- Do you want e-mail notification? (y/n) [y]:
  - What's your e-mail address?   -- enter your email address here

 - We found your SMTP server as: example.test.com.
  - Do you want to use it? (y/n) [y]: n

  - What's your SMTP server ip/host? enter your preffered smtp server here

 3.2- Do you want to run the integrity check daemon? (y/n) [y]:
   (this is for file integrity checking, alerts you to changes to
files on your system)

  - Running syscheck (integrity check daemon).

 3.3- Do you want to run the rootkit detection engine? (y/n) [y]:
  (this checks for rootkits on a regular basis)

  - Running rootcheck (rootkit detection).

 3.4- Active response allows you to execute a specific
      command based on the events received. For example,
      you can block an IP address or disable access for
      a specific user.
      More information at:
      https://ossec-docs.readthedocs.io/en/latest/manual/ar/

  - Do you want to enable active response? (y/n) [y]:
(this can block attacks that meet certain rules)
If you select [y] yes for Active response, you are adding Intrusion Prevention capability. This is good, but you need to white list your own IP's as you don't want Active response to trigger against your IP and auto block your access. This could happen if you failed multiple ssh logins, or if you were to run a vulnerability scan against your IP as OSSEC would detect this as an attack. Your IP would get blocked, and you would be unable to ssh to your server for example to manage it!
After compiling is complete you will be presented with final instructions:
- System is Debian (Ubuntu or derivative).
 - Init script modified to start OSSEC HIDS during boot.

 - Configuration finished properly.

 - To start OSSEC HIDS:
               /var/ossec/bin/ossec-control start

 - To stop OSSEC HIDS:
               /var/ossec/bin/ossec-control stop

 - The configuration can be viewed or modified at /var/ossec/etc/ossec.conf


   Thanks for using the OSSEC HIDS.
   If you have any question, suggestion or if you find any bug,
   contact us at [email protected] or using our public maillist at
   [email protected]
   ( https://www.ossec.net/about.html#support-options ).

   More information can be found at https://www.ossec.net

   ---  Press ENTER to finish (maybe more information below). ---
That's it your done. Now start the server with:
user@test:~/ossec-3.6.0/$ sudo /var/ossec/bin/ossec-control start
After your initial install, you will get several alerts - assuming your SMTP is configured correctly. Agent starting up, new user logged in, that sort of thing.
For 15 minutes work, you now have real-time security monitoring of your server. If you would like to test active response try our online vulnerability scans and test your hosts defence.
If you have Active response enabled, vulnerability scanners will likely get blocked, and the scan will not be completed. To run a full scan against your system with Active response enabled, try adding the scanning host to the OSSEC white-list (preferred) or disable OSSEC for the duration of the scan (not recommended). Make sure you re-enable your protection after the scan completes.
Full installation instructions are available here https://www.ossec.net/docs/manual/installation/install-source.html
Discover how to do more with OSSEC
Learn how to detect WordPress attacks and monitor the application and web server logs.
Next level testing with advanced Security Vulnerability Scanners.
Trusted tools. Hosted for easy access.